Instrumented unit tests are tests that run on physical devices and
emulators, and they can take advantage of the Android framework APIs and
supporting APIs, such as the Android Testing Support Library. You should create
instrumented unit tests if your tests need access to instrumentation
information (such as the target app's Context) or if
they require the real implementation of an Android framework component (such as
a Parcelable or SharedPreferences
object).
Using instrumented unit tests also helps to reduce the effort required to write and maintain mock code. You are still free to use a mocking framework, if you choose, to simulate any dependency relationships.
Set Up Your Testing Environment
In your Android Studio project, you must store the source files for
instrumented tests at
module-name/src/androidTests/java/. This directory
already exists when you create a new project.
Before you begin, you should download the Android Testing Support Library Setup, which provides APIs that allow you to quickly build and run instrumented test code for your apps. The Testing Support Library includes a JUnit 4 test runner (AndroidJUnitRunner ) and APIs for functional UI tests (Espresso and UI Automator).
You also need to configure the Android testing dependencies for your project to use the test runner and the rules APIs provided by the Testing Support Library. To simplify your test development, you should also include the Hamcrest library, which lets you create more flexible assertions using the Hamcrest matcher APIs.
In your app's top-level build.gradle file, you need to specify these
libraries as dependencies:
dependencies {
    androidTestCompile 'com.android.support:support-annotations:24.0.0'
    androidTestCompile 'com.android.support.test:runner:0.5'
    androidTestCompile 'com.android.support.test:rules:0.5'
    // Optional -- Hamcrest library
    androidTestCompile 'org.hamcrest:hamcrest-library:1.3'
    // Optional -- UI testing with Espresso
    androidTestCompile 'com.android.support.test.espresso:espresso-core:2.2.2'
    // Optional -- UI testing with UI Automator
    androidTestCompile 'com.android.support.test.uiautomator:uiautomator-v18:2.1.2'
}
To use JUnit 4 test classes, make sure to specify AndroidJUnitRunner as the default test instrumentation runner in your
project by including the following setting in your app's module-level build.gradle
file:
android {
    defaultConfig {
        testInstrumentationRunner "android.support.test.runner.AndroidJUnitRunner"
    }
}
Create an Instrumented Unit Test Class
Your instrumented unit test class should be written as a JUnit 4 test class. To learn more about creating JUnit 4 test classes and using JUnit 4 assertions and annotations, see Create a Local Unit Test Class.
To create an instrumented JUnit 4 test class, add the @RunWith(AndroidJUnit4.class)
annotation at the beginning of your test class definition. You also need to specify the
AndroidJUnitRunner class
provided in the Android Testing Support Library as your default test runner. This step is described
in more detail in
Getting Started with Testing
The following example shows how you might write an instrumented unit test to test that
the Parcelable interface is implemented correctly for the
LogHistory class:
import android.os.Parcel;
import android.support.test.runner.AndroidJUnit4;
import android.util.Pair;
import org.junit.Test;
import org.junit.runner.RunWith;
import java.util.List;
import static org.hamcrest.Matchers.is;
import static org.junit.Assert.assertThat;

@RunWith(AndroidJUnit4.class)
@SmallTest
public class LogHistoryAndroidUnitTest {

    public static final String TEST_STRING = "This is a string";
    public static final long TEST_LONG = 12345678L;
    private LogHistory mLogHistory;

    @Before
    public void createLogHistory() {
        mLogHistory = new LogHistory();
    }

    @Test
    public void logHistory_ParcelableWriteRead() {
        // Set up the Parcelable object to send and receive.
        mLogHistory.addEntry(TEST_STRING, TEST_LONG);

        // Write the data.
        Parcel parcel = Parcel.obtain();
        mLogHistory.writeToParcel(parcel, mLogHistory.describeContents());

        // After you're done with writing, you need to reset the parcel for reading.
        parcel.setDataPosition(0);

        // Read the data.
        LogHistory createdFromParcel = LogHistory.CREATOR.createFromParcel(parcel);
        List<Pair<String, Long>> createdFromParcelData = createdFromParcel.getData();

        // Verify that the received data is correct.
        assertThat(createdFromParcelData.size(), is(1));
        assertThat(createdFromParcelData.get(0).first, is(TEST_STRING));
        assertThat(createdFromParcelData.get(0).second, is(TEST_LONG));
    }
}
Create a test suite
To organize the execution of your instrumented unit tests, you can group a collection of test classes in a test suite class and run these tests together. Test suites can be nested; your test suite can group other test suites and run all their component test classes together.
A test suite is contained in a test package, similar to the main application package. By
convention, the test suite package name usually ends with the .suite suffix (for example,
com.example.android.testing.mysample.suite).
To create a test suite for your unit tests, import the JUnit
RunWith and
Suite classes. In your test suite, add the
@RunWith(Suite.class) and the @Suite.SuitClasses() annotations. In
the @Suite.SuiteClasses() annotation, list the individual test classes or test
suites as arguments.
The following example shows how you might implement a test suite called UnitTestSuite
that groups and runs the CalculatorInstrumentationTest and
CalculatorAddParameterizedTest test classes together.
import com.example.android.testing.mysample.CalculatorAddParameterizedTest;
import com.example.android.testing.mysample.CalculatorInstrumentationTest;
import org.junit.runner.RunWith;
import org.junit.runners.Suite;

// Runs all unit tests.
@RunWith(Suite.class)
@Suite.SuiteClasses({CalculatorInstrumentationTest.class,
        CalculatorAddParameterizedTest.class})
public class UnitTestSuite {}
Run Instrumented Unit Tests
To run your instrumented tests, follow these steps:
- Be sure your project is synchronized with Gradle by clicking
Sync Project
 in the toolbar.
 - Run your test in one of the following ways:
- To run a single test, open the Project window, and then
right-click a test and click Run
 .
. - To test all methods in a class, right-click a class or method in the
test file and click Run .
- To run all tests in a directory, right-click on the
directory and select Run tests .
- To run a single test, open the Project window, and then
right-click a test and click Run
The Android Plugin
for Gradle compiles the instrumented test code located in the default
directory (src/androidTest/java/), builds a test APK and production
APK, installs both APKs on the connected device or emulator, and runs the
tests. Android Studio then displays the results of the instrumented test execution in the
Run window.
Note: While running or debugging instrumented tests, Android Studio does not inject the additional methods required for Instant Run and turns the feature off.
Run your tests with Firebase Test Lab
Using Firebase Test Lab, you can simultaneously test your app on many popular Android devices and configurations such as locale, orientation, screen size, and platform version. These tests run on actual physical devices in remote Google data centers. You can deploy to Firebase Test Lab directly from Android Studio or from the command line. Test results provide test logs and include the details of any app failures.
Before you can start using Firebase Test Lab, you need to:
- Create a Google Cloud Platform account to use with active billing.
- Create a Google Cloud project for your app.
- Set up an active billing account and associate it with the project you just created.
Configure a test matrix and run a test
Android Studio provides integrated tools that allow you to configure how you want to deploy your tests to Firebase Test Lab. After you have created a Google Cloud project with active billing, you can create a test configuration and run your tests:
- Click Run > Edit Configurations from the main menu.
- Click Add New Configuration (+) and select Android Tests.
- In the Android Test configuration dialog:
- Enter or select the details of your test, such as the test name, module type, test type, and test class.
- From the Target drop-down menu under Deployment Target Options, select Cloud Test Lab Device Matrix.
- If you are not logged in, click Connect to Google Cloud Platform and allow Android Studio access to your account.
- Next to Cloud Project, click the
 button and select your Google Cloud
Platform project from the list.
button and select your Google Cloud
Platform project from the list.
- Create and configure a test matrix:
- Next to the Matrix Configuration drop-down list, click
Open Dialog
 .
.
- Click Add New Configuration (+).
- In the Name field, enter a name for your new configuration.
- Select the device(s), Android version(s), locale(s) and screen orientation(s) that you want to test your app with. Firebase Test Lab will test your app against every combination of your selections when generating test results.
- Click OK to save your configuration.
- Next to the Matrix Configuration drop-down list, click
Open Dialog
- Click OK in the Run/Debug Configurations dialog to exit.
- Run your tests by clicking Run .
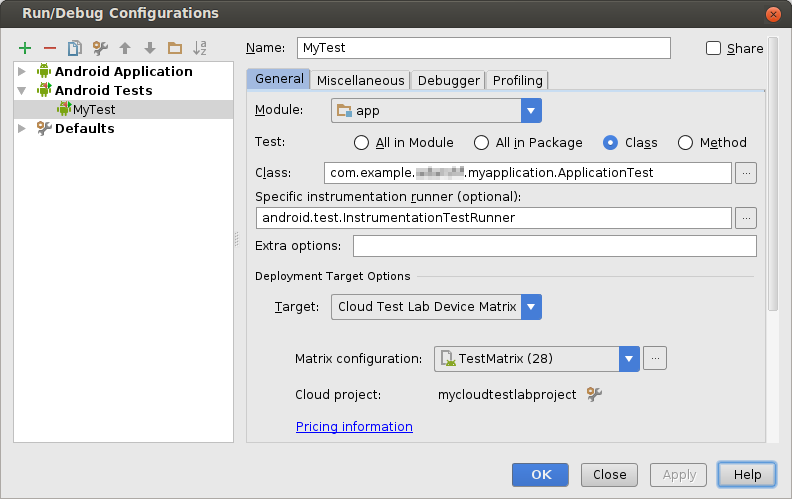
Figure 1. Creating a test configuration for Firebase Test Lab.
Analyzing test results
When Firebase Test Lab completes running your tests, the Run window
will open to show the results, as shown in figure 2. You may need to click
Show Passed  to see all your executed tests.
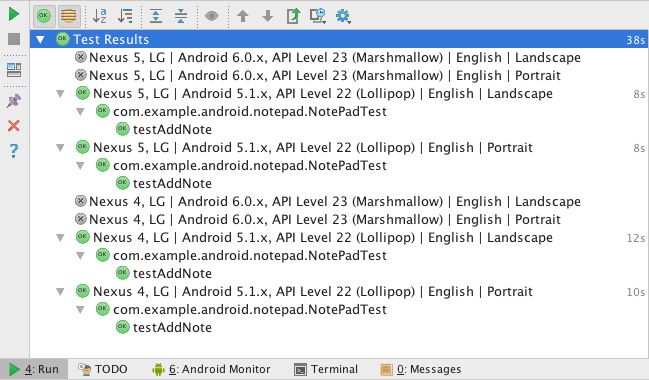
Figure 2. Viewing the results of instrumented tests using Firebase Test Lab.
You can also analyze your tests on the web by following the link displayed at the beginning of the test execution log in the Run window, as shown in figure 3.
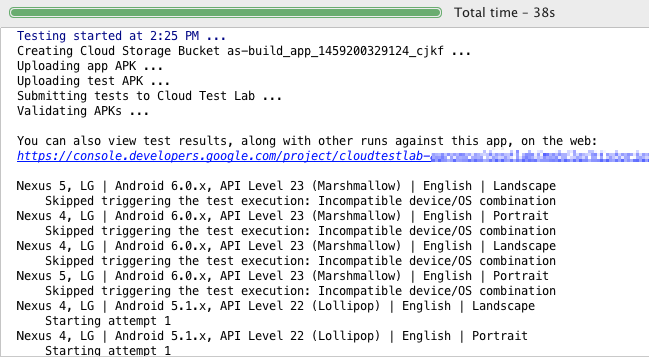
Figure 3. Click the link to view detailed test results on the web.
To learn more about interpreting web results, see Analyze Firebase Test Lab for Android Results.