Design Guide
Action Buttons
The app bar allows you to add buttons for user actions. This feature lets you put the most important actions for the current context right at the top of the app. For example, a photo browsing app might show share and create album buttons at the top when the user is looking at their photo roll; when the user looks at an individual photo, the app might show crop and filter buttons.
Space in the app bar is limited. If an app declares more actions than can fit in the app bar, the app bar send the excess actions to an overflow menu. The app can also specify that an action should always be shown in the overflow menu, instead of being displayed on the app bar.
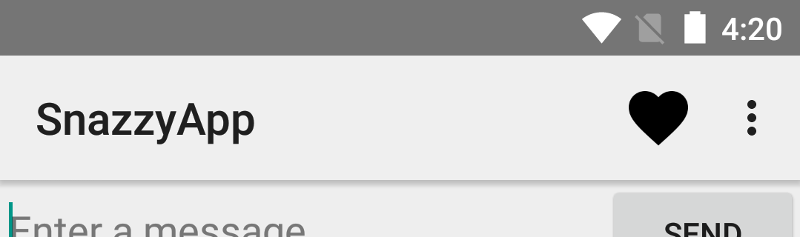
Figure 1. An app bar with a single action button and an overflow menu.
Add Action Buttons
All action buttons and other items available in the action overflow are
defined in an XML menu resource. To
add actions to the action bar, create a new XML file in your project's
res/menu/ directory.
Add an <item>
element for each item you want to include in the action bar, as shown in this
code example of a menu XML file:
<menu xmlns:android="http://schemas.android.com/apk/res/android" >

    <!-- "Mark Favorite", should appear as action button if possible -->
    <item
        android:id="@+id/action_favorite"
        android:icon="@drawable/ic_favorite_black_48dp"
        android:title="@string/action_favorite"
        app:showAsAction="ifRoom"/>

    <!-- Settings, should always be in the overflow -->
    <item android:id="@+id/action_settings"
          android:title="@string/action_settings"
          app:showAsAction="never"/>

</menu>
The app:showAsAction attribute specifies whether the action
should be shown as a button on the app bar. If you set
app:showAsAction="ifRoom" (as in the example code's favorite action), the action is displayed as a button
if there is room in the app bar for it; if there is not enough room, excess
actions are sent to the overflow menu. If you set
app:showAsAction="never" (as in the example code's settings action), the action is always listed in the
overflow menu, not displayed in the app bar.
The system uses the action's icon as the action button if the action is displayed in the app bar. You can find many useful icons on the Material Icons page.
Respond to Actions
When the user selects one of the app bar items, the system calls your
activity's onOptionsItemSelected() callback method, and passes a MenuItem object to indicate which item was clicked. In your
implementation of onOptionsItemSelected(), call the MenuItem.getItemId() method to determine which item was pressed. The ID returned
matches the value you declared in the corresponding <item>
element's android:id attribute.
For example, the following code checks to see which action the user selected. If the method does not recognize the user's action, it invokes the superclass method:
@Override
public boolean onOptionsItemSelected(MenuItem item) {
    switch (item.getItemId()) {
        case R.id.action_settings:
            // User chose the "Settings" item, show the app settings UI...
            return true;

        case R.id.action_favorite:
            // User chose the "Favorite" action, mark the current item
            // as a favorite...
            return true;

        default:
            // If we got here, the user's action was not recognized.
            // Invoke the superclass to handle it.
            return super.onOptionsItemSelected(item);

    }
}