This lesson teaches you to
- Create a Linear Layout
- Add a Text Field
- Add String Resources
- Add a Button
- Make the Input Box Fill in the Screen Width
You should also read
In this lesson, you create a layout in XML that includes a text field and a button. In the next lesson, your app responds when the button is pressed by sending the content of the text field to another activity.
The graphical user interface for an Android app is built using a hierarchy of View and ViewGroup objects. View objects are
usually UI widgets such as buttons or
text fields.
ViewGroup objects are
invisible view containers that define how the child views are laid out, such as in a
grid or a vertical list.
Android provides an XML vocabulary that corresponds to the subclasses of View and ViewGroup so you can define your UI in XML using
a hierarchy of UI elements.
Layouts are subclasses of the ViewGroup. In this exercise, you'll work with
a LinearLayout.
Alternative Layouts
Declaring your UI layout in XML rather than runtime code is useful for several reasons, but it's especially important so you can create different layouts for different screen sizes. For example, you can create two versions of a layout and tell the system to use one on "small" screens and the other on "large" screens. For more information, see the class about Supporting Different Devices.
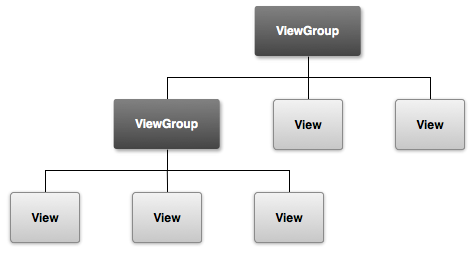
Figure 1. Illustration of how ViewGroup objects form branches in the layout and contain other View objects.
Create a Linear Layout
- From the
res/layout/directory, open theactivity_main.xmlfile.This XML file defines the layout of your activity. It contains the default "Hello World" text view.
- When you open a layout file, you’re first shown the design editor in the Layout Editor. For this lesson, you work directly with the XML, so click the Text tab to switch to the text editor.
- Replace the contents of the file with the following XML:
<?xml version="1.0" encoding="utf-8"?>
<LinearLayout
    xmlns:android="http://schemas.android.com/apk/res/android"
    xmlns:tools="http://schemas.android.com/tools"
    android:layout_width="match_parent"
    android:layout_height="match_parent"
    android:orientation="horizontal">
</LinearLayout>
LinearLayout is a view group (a subclass of ViewGroup) that lays out child views in either a vertical or horizontal orientation,
as specified by the android:orientation attribute. Each child of a LinearLayout appears on
the screen in the order in which it appears in the XML.
Two other attributes, android:layout_width and android:layout_height, are required for all views in order to specify their size.
Because the LinearLayout is the root view in the layout, it should fill
the entire screen area that's
available to the app by setting the width and height to
"match_parent". This value declares that the view should expand its width
or height to match the width or height of the parent view.
For more information about layout properties, see the Layout guide.
Add a Text Field
In the activity_main.xml file, within the
<LinearLayout> element, add the following
<EditText> element:
<LinearLayout
    xmlns:android="http://schemas.android.com/apk/res/android"
    xmlns:tools="http://schemas.android.com/tools"
    android:layout_width="match_parent"
    android:layout_height="match_parent"
    android:orientation="horizontal">
    <EditText android:id="@+id/edit_message"
        android:layout_width="wrap_content"
        android:layout_height="wrap_content"
        android:hint="@string/edit_message" />
</LinearLayout>
Here is a description of the attributes in the
<EditText> you added:
android:id- This provides a unique identifier for the view, which you can use to reference the object
from your app code, such as to read and manipulate the object (you'll see this in the next
lesson).
The at sign (
@) is required when you're referring to any resource object from XML. It is followed by the resource type (idin this case), a slash, then the resource name (edit_message).Resource Objects
A resource object is a unique integer name that's associated with an app resource, such as a bitmap, layout file, or string.
Every resource has a corresponding resource object defined in your project's
gen/R.javafile. You can use the object names in theRclass to refer to your resources, such as when you need to specify a string value for theandroid:hintattribute. You can also create arbitrary resource IDs that you associate with a view using theandroid:idattribute, which allows you to reference that view from other code.The SDK tools generate the
R.javafile each time you compile your app. You should never modify this file by hand.For more information, read the guide to Providing Resources.
The plus sign (
+) before the resource type is needed only when you're defining a resource ID for the first time. When you compile the app, the SDK tools use the ID name to create a new resource ID in your project'sgen/R.javafile that refers to theEditTextelement. With the resource ID declared once this way, other references to the ID do not need the plus sign. Using the plus sign is necessary only when specifying a new resource ID and not needed for concrete resources such as strings or layouts. See the sidebox for more information about resource objects. android:layout_widthandandroid:layout_height- Instead of using specific sizes for the width and height, the
"wrap_content"value specifies that the view should be only as big as needed to fit the contents of the view. If you were to instead use"match_parent", then theEditTextelement would fill the screen, because it would match the size of the parentLinearLayout. For more information, see the Layouts guide. android:hint- This is a default string to display when the text field is empty. Instead of using a hard-coded
string as the value, the
"@string/edit_message"value refers to a string resource defined in a separate file. Because this refers to a concrete resource (not just an identifier), it does not need the plus sign. However, because you haven't defined the string resource yet, you’ll see a compiler error at first. You'll fix this in the next section by defining the string.Note: This string resource has the same name as the element ID:
edit_message. However, references to resources are always scoped by the resource type (such asidorstring), so using the same name does not cause collisions.
Add String Resources
By default, your Android project includes a string resource file at
res/values/strings.xml. Here, you'll add two new strings.
- From the
res/values/directory, openstrings.xml. - Add two strings so that your file looks like this:
<?xml version="1.0" encoding="utf-8"?>
<resources>
    <string name="app_name">My First App</string>
    <string name="edit_message">Enter a message</string>
    <string name="button_send">Send</string>
</resources>
For text in the user interface, always specify each string as a resource. String resources allow you to manage all UI text in a single location, which makes the text easier to find and update. Externalizing the strings also allows you to localize your app to different languages by providing alternative definitions for each string resource.
For more information about using string resources to localize your app for other languages, see the Supporting Different Devices class.
Add a Button
Go back to the activity_main.xml file and add a button after the
<EditText>. Your file should look like this:
<LinearLayout
    xmlns:android="http://schemas.android.com/apk/res/android"
    xmlns:tools="http://schemas.android.com/tools"
    android:orientation="horizontal"
    android:layout_width="match_parent"
    android:layout_height="match_parent">
        <EditText android:id="@+id/edit_message"
          android:layout_width="wrap_content"
          android:layout_height="wrap_content"
          android:hint="@string/edit_message" />
        <Button
          android:layout_width="wrap_content"
          android:layout_height="wrap_content"
          android:text="@string/button_send" />
</LinearLayout>
Note: This button doesn't need the
android:id
attribute, because it won't be referenced from the activity code.
The layout is currently designed so that both the EditText and Button widgets are only as big as necessary to fit their content, as figure 2 shows.

Figure 2. The EditText and Button widgets have their widths set to
"wrap_content".
This works fine for the button, but not as well for the text field, because the user might type
something longer. It would be nice to fill the unused screen width
with the text field. You can do this inside a
LinearLayout with the weight property, which
you can specify using the android:layout_weight attribute.
The weight value is a number that specifies the amount of remaining space each view should consume, relative to the amount consumed by sibling views. This works kind of like the amount of ingredients in a drink recipe: "2 parts soda, 1 part syrup" means two-thirds of the drink is soda. For example, if you give one view a weight of 2 and another one a weight of 1, the sum is 3, so the first view fills 2/3 of the remaining space and the second view fills the rest. If you add a third view and give it a weight of 1, then the first view (with weight of 2) now gets 1/2 the remaining space, while the remaining two each get 1/4.
The default weight for all views is 0, so if you specify any weight value greater than 0 to only one view, then that view fills whatever space remains after all views are given the space they require.
Make the Input Box Fill in the Screen Width
In activity_main.xml, modify the
<EditText> so that the attributes look like
this:
<EditText android:id="@+id/edit_message"
    android:layout_weight="1"
    android:layout_width="0dp"
    android:layout_height="wrap_content"
    android:hint="@string/edit_message" />
Setting the width to zero (0dp) improves layout performance because using
"wrap_content" as the width requires the system to calculate a width that is
ultimately irrelevant because the weight value requires another width calculation to fill the
remaining space.

Figure 3. The EditText widget is
given all the layout weight, so it fills the remaining space in the LinearLayout.
Here’s how your complete activity_main.xmllayout file should now look:
<?xml version="1.0" encoding="utf-8"?>
<LinearLayout xmlns:android="http://schemas.android.com/apk/res/android"
   xmlns:tools="http://schemas.android.com/tools"
   android:orientation="horizontal"
   android:layout_width="match_parent"
   android:layout_height="match_parent">
    <EditText android:id="@+id/edit_message"
        android:layout_weight="1"
        android:layout_width="0dp"
        android:layout_height="wrap_content"
        android:hint="@string/edit_message" />
    <Button
        android:layout_width="wrap_content"
        android:layout_height="wrap_content"
        android:text="@string/button_send" />
</LinearLayout>
Run Your App
This layout is applied by the default Activity class
that the SDK tools generated when you created the project.
To run the app and see the results,
click Run 'app'
 in the
toolbar.
in the
toolbar.
Continue to the next lesson to learn how to respond to button presses, read content from the text field, start another activity, and more.