In-app billing frees you from processing financial transactions, but you still need to perform a few administrative tasks. These tasks include the following:
- Setting up and maintaining your product list on the Google Play Developer Console.
- Registering test accounts.
- Handling refunds when necessary.
To register a test account, you must have a Google Play publisher account. If you already have a publisher account on Google Play, you can use your existing account. You do not need to register for a new account to support in-app billing. If you don't have a publisher account, you can register as a Google Play developer and set up a publisher account through the Google Play Developer Console.
If you want to create a product list and issue refunds to your users, you must have a Google payments merchant account. If you don't have a merchant account, you can register for one through the Developer Console.
Creating a Product List
The Google Play Developer Console provides a product list for each of your published apps. You can sell an item using Google Play's in-app billing feature only if the item is listed on an app's product list. Each app has its own product list; you cannot sell items that appear on another app's product list.
You can access an app's product list by opening the In-app Products
page for an app that is listed in your developer account. The link to the
In-app Products page appears only if you have a Google payments merchant
account and the app's manifest includes the
com.android.vending.BILLING permission. For more information about this
permission, see
Updating Your App's Manifest.
A product list specifies items you are selling in an app: in-app products, subscriptions, or a combination of both. For each item, the product list contains information such as product ID, product description, and price. You can create a product list for any published app, including apps published to the alpha and beta channels.
The product list stores only metadata about the items you are selling in your app. It does not store any digital content. You are responsible for storing and delivering the digital content that you sell in your apps.
Note: Previously, you could test an app by uploading an unpublished draft version. This functionality is no longer supported; instead, you must publish it to the alpha or beta distribution channel. For more information, see Draft Apps are No Longer Supported.
In addition, an app package can have only one product list. If you create a product list for an app, and you use the multiple APK feature to distribute more than one APK for that app, the product list applies to all APK versions that are associated with the app listing. You cannot create individual product lists for each APK if you are using the multiple APK feature.
You can add items to a product list two ways: you can add items one at a time on the In-app Products page, or you can add a batch of items by importing the items from a comma-separated values (CSV) file. Adding items one at a time is useful if your app has only a few in-app items or you are adding only a few items to a product list for testing purposes. The CSV file method is useful if your app has a large number of in-app items.
Note: Batch upload of product lists containing subscriptions is not supported. Also, when updating existing items in a batch upload, you cannot include changes to in-app products that are linked to a pricing template.
Adding items one at a time to a product list
To add an item to a product list using the Developer Console UI, follow these steps:
- Log in to your publisher account.
- In the All applications panel, click on the app name, then open the In-app Products page.
Click Add new product. After you provide the product type and ID for the item you are selling, click Continue.
- Product Type
-
The product type can be Managed product or Subscription. You cannot change an item's product type after you create the item. For more information, see Choosing a Product Type.
Note: For subscription items, you cannot change the item's price once you have published the item.
- Product ID
-
Product IDs are unique across an app's namespace. A product ID must start with a lowercase letter or a number and must be composed of only lowercase letters (a-z), numbers (0-9), underscores (_), and periods (.). The product ID
android.testis reserved, as are all product IDs that start withandroid.test.Note: Be sure to plan your product ID namespace carefully. You cannot modify an item's product ID after the item is created, and you cannot reuse a product ID within an app.
Enter additional information about the item, then click Save.
- Publishing State
-
An item's publishing state can be Active or Inactive. To be visible to a user during checkout, an item's publishing state must be set to Active, and the item's app must be published on Google Play.
Note: If you're using a test account, users can see active items within unpublished apps, as well. For more information, see Testing In-app Billing.
- Languages and Translations
-
By default, in-app products inherit their default language from the parent app.
You can provide localized titles and descriptions for your in-app products by selecting Add Translations. If you want Google Play to translate your title and description for you, based on the title and description in the default language, just choose the languages that you want to offer. You can also provide custom translations in specific languages.
- Title
- The title is a short descriptor for the item. An example of a title is: "Sleeping potion." Every item must have a title. The title is visible to users during checkout. For optimum appearance, titles should be no longer than 25 characters; however, titles can be up to 55 characters in length.
- Description
- The description is a long descriptor for the item. An example of a description is: "Instantly puts creatures to sleep. Does not work on angry elves." Every item must have a description. Descriptions can be up to 80 characters in length.
- Price
-
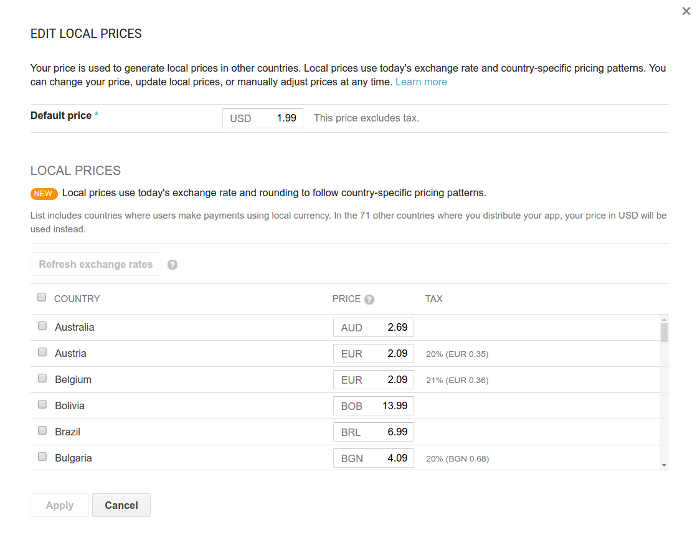
Provide a price in your home currency, or link the price to an existing pricing template. Based on the price you enter or the prices from the pricing template, the system autofills country-specific prices for different currencies. These generated prices use current exchange rates and locally relevant pricing patterns (see figure 1).
You can also change prices for other currencies manually, but you can do this only if a currency is used in one of the target countries for your app. You can specify target countries for your app on the Pricing & Distribution page in the Google Play Developer Console.
Adding a batch of items to a product list
To add a batch of items to a product list using a CSV file, you first need to create your CSV file. The data values that you specify in the CSV file represent the same data values you specify manually through the In-app Products UI (see Adding items one at a time to a product list).
If you are importing and exporting CSV files with in-app products, keep country-specific pricing in mind. If you use auto-fill, you can provide a tax-exclusive default price, and tax-inclusive prices will be auto-filled. If you do not use auto-fill, prices you provide must include tax.
Note: Batch upload of product lists containing subscriptions is not supported. Also, when updating existing items in a batch upload, you cannot include changes to in-app products that are linked to a pricing template.
To import the items that are specified in your CSV file, do the following:
- Log in to your publisher account.
- In the All applications panel, select the app name, then open the In-app Products page.
- On the In-app Products List page, click Import/Export
> Import in-app products from CSV file, then select your
CSV file.
The CSV file must be on your local computer or on a local disk that is connected to your computer.
- Select the Overwrite checkbox if you want to overwrite existing items in
your product list.
This option overwrites values of existing items only if the value of the product_id in the CSV file matches the In-app Product ID for an existing item in the product list. Overwriting doesn't delete items that are on a product list but not present in the CSV file.
You can also export an existing product list to a CSV file by clicking Export to CSV on the In-app Product List page. This is useful if you have manually added items to a product list and you want to start managing the product list through a CSV file.
Formatting batches of items
The CSV file uses commas (,) and semicolons (;) to separate data values. Commas are used to separate primary data values, and semicolons are used to separate subvalues. For example, the syntax for the CSV file is as follows:
"product_id","publish_state","purchase_type","autotranslate ","locale; title; description","autofill","country; price"
Descriptions and usage details are provided below.
- product_id
- This is equivalent to the In-app Product ID setting in the In-app Products UI. If you specify a product_id that already exists in a product list, and you choose to overwrite the product list while importing the CSV file, the data for the existing item is overwritten with the values specified in the CSV file. The overwrite feature does not delete items that are on a product list but not present in the CSV file.
- publish_state
-
This is equivalent to the Publishing State setting in the In-app Products UI. Can be
publishedorunpublished. - purchase_type
-
This is equivalent to the Product Type setting in the In-app Products UI. Can be
managed_by_android, which is equivalent to Managed per user account in the In-app Products UI, ormanaged_by_publisher, which is equivalent to Unmanaged in the In-app Products UI. - autotranslate
-
This is equivalent to selecting the Fill fields with auto translation
checkbox in the In-app Products UI. Can be
trueorfalse. - locale
-
This is equivalent to the Language setting in the In-app Products UI. You must have an entry for the default locale. The default locale must be the first entry in the list of locales, and it must include a title and description. If you want to provide translated versions of the title and description in addition to the default, you must use the following syntax rules:
-
If autotranslate is
true, you must specify the default locale, default title, default description, and other locales using the following format:"true,"default_locale; default_locale_title; default_locale_description; locale_2; locale_3, ..."
-
If autotranslate is
false, you must specify the default locale, default title, and default description as well as the translated titles and descriptions using the following format:"false,"default_locale; default_locale_title; default_locale_description; locale_2; locale_2_title; local_2_description; locale_3; locale_3_title; locale_3_description; ..."
See table 1 for a list of the language codes you can use with the locale field.
-
- title
-
This is equivalent to the Title setting in the In-app Products UI. If the title
contains a semicolon, it must be escaped with a backslash (for example,
\;). Also, a backslash must be escaped with a backslash (for example,\\). - description
-
This is equivalent to the Description in the In-app Products UI. If the description
contains a semicolon, it must be escaped with a backslash (for example,
\;). Also, a backslash must be escaped with a backslash (for example,\\). - autofill
-
This is equivalent to clicking Auto Fill in the In-app Products UI. Can be
trueorfalse. The syntax for specifying the country and price varies depending on which autofill setting you use:-
If autofill is set to
true, you need to specify only the default price in your home currency, and you must use this syntax:"true","default_price_in_home_currency"
-
If autofill is set to
false, you need to specify a country and a price for each currency, and you must use the following syntax:"false", "home_country; default_price_in_home_currency; country_2; country_2_price; country_3; country_3_price; ..."
Note: If you use an autofill value of
falseand set country prices manually, you must incorporate country-specific pricing patterns, including tax rates, into the prices you provide. -
- country
- The country for which you are specifying a price. You can only list countries that your app is targeting. The country codes are two-letter uppercase ISO country codes (such as "US"), as defined by ISO 3166-2.
- price
-
This is equivalent to the Price in the In-app Products UI. The price must be specified in
micro-units. To convert a currency value to micro-units, you multiply the real value by
1,000,000.
For example, if you want to sell an in-app item for $1.99, you specify
1990000in the price field.
Table 1. Language codes you can use with the locale field.
| Language | Code | Language | Code |
|---|---|---|---|
| Chinese | zh_TW | Italian | it_IT |
| Czech | cs_CZ | Japanese | ja_JP |
| Danish | da_DK | Korean | ko_KR |
| Dutch | nl_NL | Norwegian | no_NO |
| English | en_US | Polish | pl_PL |
| French | fr_FR | Portuguese | pt_PT |
| Finnish | fi_FI | Russian | ru_RU |
| German | de_DE | Spanish | es_ES |
| Hebrew | iw_IL | Swedish | sv_SE |
| Hindi | hi_IN | -- | -- |
Pricing Templates
If you sell multiple apps at the same price, or if you sell multiple in-app products at the same price across one or more apps, you can add pricing templates. These templates make it easier to manage shared prices.
Adding a pricing template
When creating a pricing template, you provide new pricing information that you can apply to paid apps and in-app products. To add a pricing template, do the following:
- Log in to your publisher account.
- In the Settings panel, open the Pricing template page.
-
If you are adding your first pricing template, the Add a Pricing Template banner appears. Select Add template to create a new template. The new template's Pricing tab appears.
Otherwise, you see a list of your pricing templates. Select New pricing template. The new template's Pricing tab appears.
-
Provide details about the template. These details include the name, the price, and whether to include tax as part of your country-specific prices.
Based on the price and tax option you provide, the Developer Console generates prices for international currencies using current exchange rates and country-specific pricing patterns.
- Select Create template to finish adding the template.
Linking a pricing template
You can create links between pricing templates and sets of paid apps and in-app products that share the same price. After completing this linking process, any changes you make to the pricing template are applied to the prices of items that you've linked to the template. To complete the linking process, use either the pricing template's Linked Items tab or the Price section within a paid app or in-app product's pricing page.
Note: Since a subscription within your app has a constant price, you cannot link a subscription with a pricing template. You can, however, import the prices from a pricing template and apply them to a new subscription.
Linking a pricing template to in-app products and paid apps
To link a pricing template to an in-app product, do the following:
- Log in to your publisher account.
- In the Settings panel, open the Pricing template page. This page shows the list of pricing templates you have created for your account.
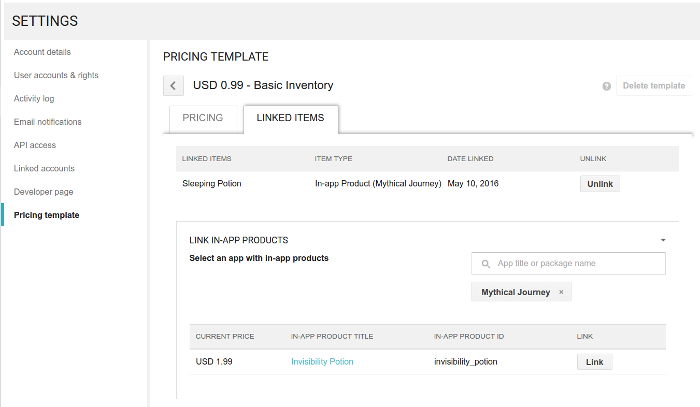
- Choose an existing pricing template that you want to link to an in-app product, then select the template's Linked Items tab. This tab shows options to link your pricing template to in-app products and paid apps (see figure 2).
- In the Link In-App Products section of the tab, enter or choose the name of an app. This app should contain the in-app product that you want to link to your pricing template.
- Based on the app that you selected, you see a list of in-app products that are active and are not yet linked to a pricing template. Choose the in-app product that you want to link to the pricing template by selecting the Link button that appears in the same row as the in-app product.
- The price of the in-app product is now linked to your pricing template. Any changes you make to the prices within your pricing template affect the prices of the linked in-app product.
To link a pricing template to the price of a paid app, you follow a similar process. On the pricing template's Linked Items tab, choose a paid app in the Link Paid Apps section.
Linking an in-app product or paid app to a pricing template
To link an in-app product to a pricing template, do the following:
- Log in to your publisher account.
- In the All applications panel, select the app name, then open the In-app Products page.
- Choose the in-app product that you want to link to a pricing template. The item's details page appears.
- In the Pricing section, choose the pricing template that you want to link to the price of this in-app product.
- The price of the in-app product is now linked to the pricing template you selected. Any changes you make to the prices within your pricing template affect the prices of this in-app product.
To link the price of a paid app to a pricing template, you follow a similar process on the app's Pricing & Distribution page.
Deleting an item that is linked to a pricing template
As your app evolves, you may find it useful to remove older versions of in-app products or unpublish paid apps, some of which may be linked to pricing templates. To delete an in-app product or unpublish a paid app that is linked to a pricing template, complete the following steps. You don't need to unlink the in-app product or paid app from the pricing template beforehand.
Deleting an in-app product that is linked to a template
To delete an in-app product that is linked to a template, do the following:
- Log in to your publisher account.
- Select the app that contains the in-app product you want to delete.
- Open the app's In-app Products page.
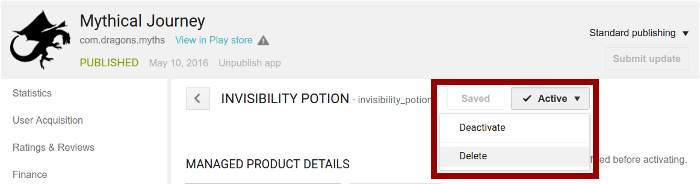
- Choose the in-app product that you want to delete.
- Select the button that indicates whether the in-app product is active or inactive (enclosed in a box within figure 3). The drop-down menu includes a Delete option.
- Select Delete, then choose Yes in the confirmation dialog that appears.
Unpublishing a paid app that is linked to a template
To unpublish a paid app that is already published and is linked to a template, do the following:
- Log in to your publisher account.
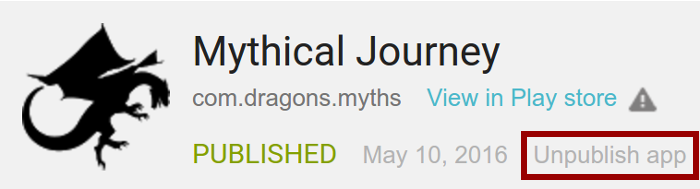
- Select the app that you want to unpublish.
- Select Unpublish app (enclosed in a box within figure 4), then choose Unpublish in the confirmation dialog that appears.
Deleting a pricing template
If you no longer need a pricing template, you can delete it by completing the following steps:
- Log in to your publisher account.
- In the Settings panel, open the Pricing template page, which shows the list of pricing templates you have created for your account.
- Select the pricing template that you wish to delete.
- On the pricing template's Linked Items tab, unlink all in-app products that are linked to the template.
- Select Delete template.
Choosing a Product Type
An item's product type controls how Google Play manages the purchase of the item. The supported product types include "managed product" and "subscription." Since support for different product types can vary among versions of the In-app Billing API, make sure that you choose a product type that's valid for the version of the In-app Billing API that your app uses.
For details, refer to the documentation for the In-app Billing API.
Handling Refunds
In-app billing does not allow users to send a refund request to Google Play. Refunds for in-app purchases must be directed to you (the app developer). You can then process the refund through your Google payments merchant account. When you do this, Google Play receives a refund notification from Google payments, and Google Play sends a refund message to your app. For more information, see Handling IN_APP_NOTIFY messages and In-app Billing Pricing.
Important: You cannot use the API to issue refunds or cancel In-app Billing transactions. You must do this manually through your Google payments merchant account. However, you can use the API to retrieve order information.
Working with Order Numbers
When a user purchases an in-app item, Google assigns the transaction
a unique and permanent order number. Google Play provides that order number to
you at the conclusion of the purchase flow, as the value of the
orderId field of the PURCHASE_STATE_CHANGED
intent.
Note: Test purchases don't have an orderId
field. To track test transactions, you use the purchaseToken
field instead. For more information about working with test purchases, see Testing In-app
Billing.
In your app, you can use the order number as a general-purpose identifier for the in-app purchase transaction. After the purchase, you can use the order number as a means of tracking the transaction in reconciliation reports and for customer support.
The order number itself is a string consisting of numbers only, with a format assigned and managed by Google.
For transactions dated 5 December 2012 or later, Google payments assigns a
Merchant Order Number (rather than a Google Order Number) and reports the Merchant
Order Number as the value of orderId. Here's an
example:
"orderId" : "GPA.1234-5678-9012-34567"
For transactions dated previous to 5 December 2012, Google checkout assigned
a Google Order Number and reported that number as the value of
orderId. Here's an example of an orderId holding a
Google Order Number:
"orderId" : "556515565155651"
Setting Up Test Accounts
The Google Play Developer Console lets you set up one or more test accounts. A test account is a regular Google account that you register on the Developer Console as a test account. Test accounts are authorized to make in-app purchases from apps that you have uploaded to the Google Play Developer Console but have not yet published.
You can use any Google account as a test account. Test accounts are useful if you want to let multiple people test In-app Billing on apps without giving them access to your publisher account's sign-in credentials. If you want to own and control the test accounts, you can create the accounts yourself and distribute the credentials to your developers or testers.
Test accounts have three limitations:
- Test account users can make purchase requests only within apps that are already uploaded to your publisher account (although the app doesn't need to be published).
- Test accounts can only be used to purchase items that are listed (and published) in an app's product list.
- Test account users do not have access to your publisher account and cannot upload apps to your publisher account.
To add test accounts to your publisher account, follow these steps:
- Log in to your publisher account.
- Click the Settings icon.
- Locate the License Testing panel.
- Add the email addresses for the test accounts you want to register, separating each account with a comma.
- Click Save to save your profile changes.
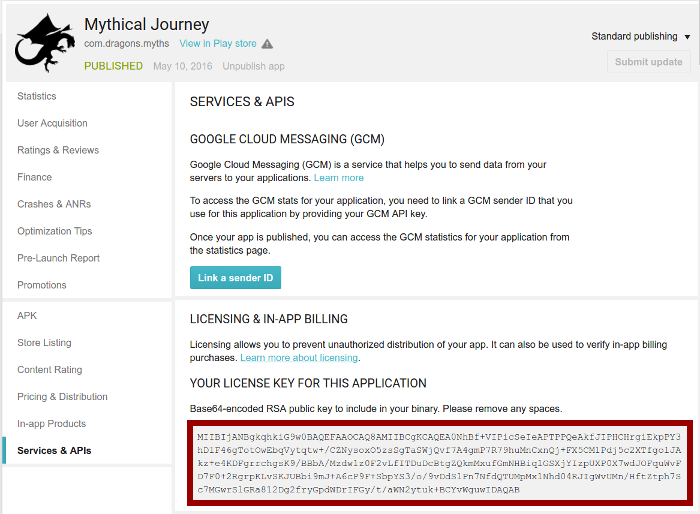
Getting an app's license key
The Google Play Developer Console provides a public licensing key for each app.
To locate the key for an app, follow these steps:
- Open the All applications panel.
- Click on the app name, then open the Services & APIs page.
- Scroll down to the section of the page labeled Your License Key for This Application, as shown in figure 5.
Previously, the Developer Console provided a single public key per developer account. To transition apps to the new per-app public key, the Developer Console sets the app-specific key as the former developer key. This ensures compatibility for apps that depend on the (former) developer key.
Where to Get Support
If you have questions or encounter problems while implementing In-app Billing, contact the support resources listed in the following table (see table 2). By directing your queries to the correct forum, you can get the support you need more quickly.
Table 2. Developer support resources for Google Play In-app Billing.
| Support Type | Resource | Range of Topics |
|---|---|---|
| Development and testing issues | Google Groups: android-developers | In-app billing integration questions, user experience ideas, handling of responses, obfuscating code, IPC, test environment setup. |
| Stack Overflow: http://stackoverflow.com/questions/tagged/ android | ||
| Billing issue tracker | Billing project issue tracker | Bug and issue reports related specifically to In-app Billing sample code. |
For general information about how to post to the groups listed above, see Developer Forums document in the Resources tab.